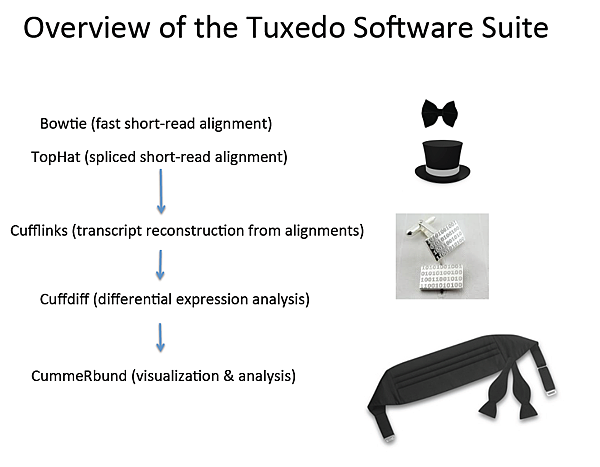
此套分析流程的開發團隊將此protocol取名為燕尾服(Tuxedo Suite),目的是將NGS技術定序RNA-Seq的reads透過alignment到已知基因體序列後,進行重組轉錄本(transcript reconstruction)、genes/transcripts 定量及分析不同condition間有顯著差異的genes/ transcripts,最後在搭配R語言將統計結果圖像化;此套分析流程適用於有已知基因體序列的物種(例如:人類、老鼠、斑馬魚、阿拉伯芥、番茄..等)。

燕尾服的開發團隊作者如下圖,是一個橫跨多所大學及研究機構所完成的分析protocol。

由於RNA-Seq的reads會有包含橫跨exon-junction的情形,燕尾服protocol的第一個步驟是使用tophat將reads map回genome,如下圖,概念上簡單說是當reads無法end-to-end的map回genome時,這種reads會被切為多個片段(segment),透過小片段的segment map回genome後搭配flanking找出跨越exon的reads。

上圖來源於(http://genomebiology.com/2013/14/4/R36/figure/F6)
透過tophat將reads map回genome後(下圖a),接著會透過Cufflinks來重建轉錄本(Transcript Reconstruction),這個步驟是以genome為參考序列進行assembly (reference-based assembly);由於pre-mRNA會透過alternative splicing形成不同的transcript isoforms, 透過橫跨exon-junction的reads能回推有哪些類型的transcript isoforms存在(下圖b,c,d)。


經過transcript reconstruction後,將進行基因及轉錄本的定量(quantification),定量的概念如下圖,當我們將reads map到genome後,可得知每一個gene/transcript有多少條 reads覆蓋 (稱為read count),可以想像越長的基因,能被覆蓋到的read count就越多,所以會將read count normalize 基因的長度及本次實驗的定序量,定量的單位有RPKM及FPKM,在Cufflinks的方法中,是使用FPKM為基因表現量的單位。

當定量完後,若實驗設計有多個組別要互相比較表現量,則可透過Cuffdiff計算顯著表現的genes/ transcripts及使用CummeRbund呈現統計結果。
簡單介紹燕尾服Protocol的基本概念後,接著要教學如何操作這個protocol。本次要練習的資料,實驗設計是假設有兩個不同Condition的RNA-Seq資料,我們想找出這兩個condition下最後有顯著差異的基因有哪些,且本次實驗是有已知的基因體參考序列。流程圖如下圖

上圖來源於(http://www.nature.com/nprot/journal/v7/n3/full/nprot.2012.016.html)
步驟一: 安裝 VirtualBox
請先安裝VirtualBox,用來建立虛擬電腦,安裝作業系統
Windows載點
OS X載點
這邊以Window 7 下的執行當作範例,所有的步驟都按照預設即可。

步驟二: 下載虛擬電腦的image 檔並匯入VirtualBox
之後請下載Trinity 團隊提供的Ubuntu image檔
此虛擬電腦為linux Ubuntu的作業系統,已經內建許多NGS常用的軟體。
包含Bowtie、Bowtie2、Tophat2、Cufflinks、CummeRbund、Samtools、igv、Trinity、gmap 、R…等。
對於初次接觸生物資訊的初學者來說,可能連linux的作業系統都沒用過,但生物資訊多數開發的軟體是以linux的平台為基礎,此練習省略許多安裝上的門檻,可以直接練習分析RNA-Seq資料常用到的軟體及技巧。
當VirtualBox安裝完成後請打開

選擇檔案->匯入應用裝置->選擇剛剛下載的Ubuntu_RNASeqWorkshop.ova檔。


等待匯入。

當匯入完成後,可看到虛擬電腦已經建立完成,可以看到預設的基礎記憶體是4096MB,若你們練習的電腦RAM沒有那麼大,請點”設定值”,將此值調到1024MB,避免開起虛擬電腦時整個電腦Lag。

接者請案”啟動”,則會開啟虛擬電腦。

如點選啟動後出現以上的錯誤訊息,請重開機進入BIOS,將Intel Virtualization Technology 開啟,下圖是以筆者的主機板BIOS為例。

步驟三: 開啟虛擬電腦,並打開Terminal
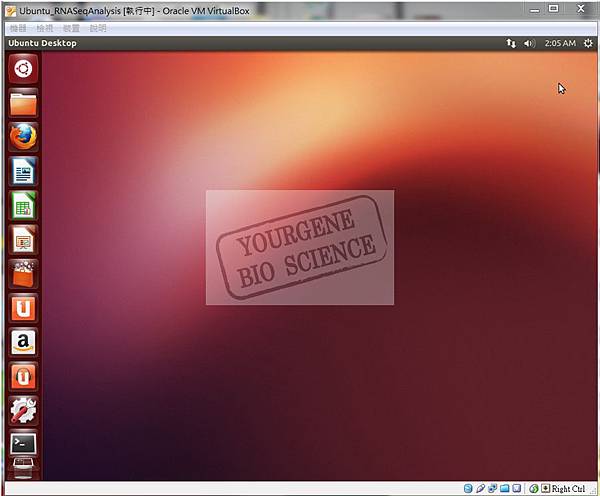
開機完成後的畫面如下,此為Ubuntu的桌面。

請從左側的選項裡找到Terminal並開啟。

開啟終端機的畫面如下。

步驟四: 進入rnaseq_workshop_data的資料夾並解壓縮範例的壓縮檔
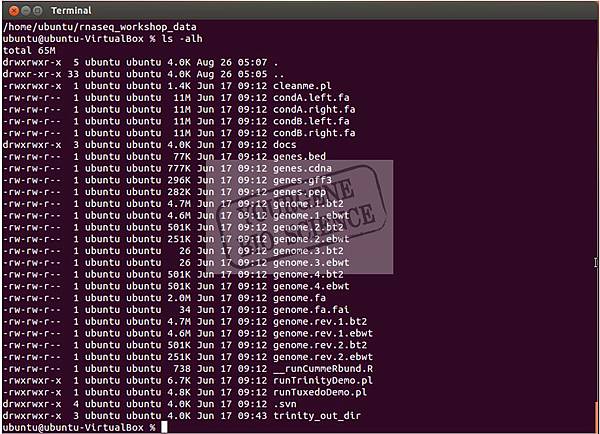
在開始練習前先簡單說明使用 terminial 時,使用 pwd 指令可以看到目前的資料夾路徑 ( 開啟 terminal 的初始路徑為 /home/ubuntu) ,要切換目錄會使用到 cd 這個指令,若要看目前這個目錄有甚麼檔案,則使用 ls -alh ,在畫面操作的結果如下圖。
> cd rnaseq_workshop_data
> ls -alh

如上圖可以看到rnaseq_workshop_data裡有一些範例檔,簡單說明有condition A的Paired-end reads(condA.left.fa.gz及condA.right.fa.gz)、condition B的Paired-end reads(condB.left.fa.gz及condB.right.fa.gz)、物種的參考序列(genome.fa.gz及bowtie和bowtie2的index檔案)。
因為這些範例檔有些有先被壓縮,副檔名為gz,在此使用gunzip這個指令來解壓縮rnaseq_workshop_data這個資料夾內的壓縮檔,如下圖執行完後請在使用ls指令可看到副檔名為gz的檔案皆已經被解壓縮。
> gunzip *.gz

步驟五: 針對Condition A 及B 執行Tophat 、Samtools 及Cufflinks
接著請依序執行下列三個指令,針對condition A的reads執行tophat及Cufflinks,執行的情形請見下圖;-l參數為最大的intron長度 -i為最小的intron長度 -o的參數為產生的report的資料夾,result的檔案細節及格式請參見(http://tophat.cbcb.umd.edu/manual.shtml)。
> tophat –I 1000 –i 20 –o condA_tophat_out genome condA.left.fa condA.right.fa
> samtools index condA_tophat_out/accepted_hits.bam
> cufflinks -o condA_cufflinks_out condA_tophat_out/accepted_hits.bam

針對condition B也依此類推,請依序執行下面三行指令,執行的畫面請見下圖
> tophat –I 1000 –i 20 –o condB_tophat_out genome condB.left.fa condB.right.fa
> samtools index condB_tophat_out/accepted_hits.bam
> cufflinks -o condB_cufflinks_out condB_tophat_out/accepted_hits.bam

步驟六: 執行cuffmerge
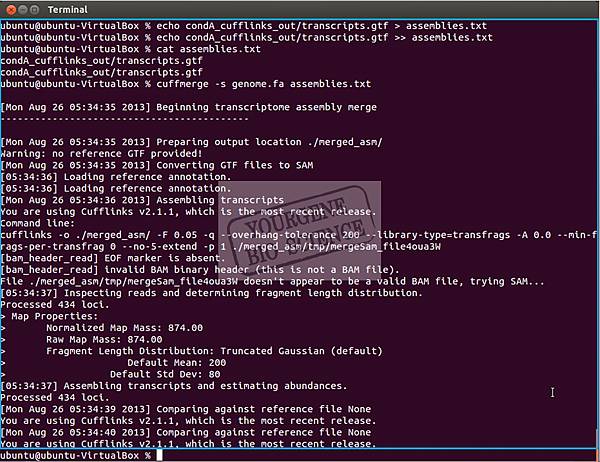
以下4個指令是將condition A及 B 使用cuffmerge將結果merged起來,執行後會有merged_asm的資料夾產生,merged.gtf為結果,此4個指令的執行情形請見下圖。
> echo condA_cufflinks_out/transcripts.gtf > assemblies.txt
> echo condB_cufflinks_out/transcripts.gtf >> assemblies.txt
> cat assemblies.txt
> cuffmerge -s genome.fa assemblies.txt

步驟七: 使用IGV 瀏覽alignment 資訊
完成上述的步驟時,此時的檔案路徑在home/ubuntu/rnaseq_workshop_data,請先回到/home/ubuntu,並且使用unzip解壓縮IGV的壓縮檔,並進入IGV_2.3.8的資料夾內開啟IGV程式。
> cd ../
> unzip IGV_2.3.8.zip
> cd IGV_2.3.8
> sh igv.sh

開啟igv後,請選Genomes-> Load Genome from File -> 選擇genome.fa

接著請選File-> Load from File -> 依序選擇condA_tophat_out/accepted_hits.bam、condB_tophat_out/accepted_hits.bam、merged_asm/merged.gtf、genes.bed

完成後可觀看這次conA及conB的alignment情形,如下圖,瀏覽IGV的方法請參考(http://www.broadinstitute.org/igv/Navigate)。

步驟八: 執行cuffdiff 挑出有顯著差異的genes/transcripts
接著請關掉IGV回到Terminal,此時的路徑為/home/ubuntu/IGV_2.3.8,請再次回到/home/ubuntu/rnaseq_workshop_data/,並執行cuffdiff,結束後的結果在diff_out資料夾下,result的檔案內容細節請參見(http://cufflinks.cbcb.umd.edu/manual.html#cuffdiff_output),執行的情形如下圖。
> cd ../rnaseq_workshop_data
> cuffdiff -o diff_out -b genome.fa -L condA,condB -u merged_asm/merged.gtf condA_tophat_out/accepted_hits.bam condB_tophat_out/accepted_hits.bam

步驟九: 使用R 語言匯入CummeRbund library 及Cuffdiff 的結果
R語言是一個統計上常使用的程式語言,在linux中要開啟最簡單的作法是在終端機打”R”,即可進入R的編輯環境,如下圖。
> R

接著請匯入CummeRbund的library,執行的情形如下圖。
> library(cummeRbund)

再來是將步驟8執行Cuffdiff的結果匯入到R中,執行的情形如下圖
> cuff=readCufflinks(‘diff_out’)

步驟十: 使用CummeRbund 產生統計圖表
CummeRbund能以Density plot、Scatter plot及Volcano plot..等 圖表來呈現多個sample內的基因表現量情形,其指令及產生的圖表如下。
Examine the distribution of expression values for the reconstructed transcripts
> csDensity(genes(cuff))

Examine transcript expression values in a scatter plot
> csScatter(genes(cuff),'condA','condB')

Examine individual densities and pairwise scatterplots together.
> csScatterMatrix(genes(cuff))

Volcano plots are useful for identifying genes most significantly differentially expressed
> csVolcanoMatrix(genes(cuff),'condA','condB')

Extract the‘genes’that are significantly differentially expressed
下列第二航的指令執行後,可看出有顯著差異的基因的筆數,如下圖,共有436筆,第三航指令是將p-value < 0.1的挑出來,可看出有74筆
> gene_diff_data=diffData(genes(cuff))
> nrow(gene_diff_data)
> sig_gene_data = subset(gene_diff_data,(significant=='yes' | p_value < 0.1))

此步驟的基因是以使用者挑選自行興趣的基因,在此以XLOC_000006為例子,可見上圖XLOC_000006為P-value < 0.1的基因。
> var_XLOC_000006=getGenes(cuff,’XLOC_000006’)

> expressionBarplot(var_XLOC_000006,logMode=T,showErrorbars=F)
Plot the gene expression values for the gene under each condition

參考資料:
- Trapnell C,Adam Roberts .,et al. Differential gene and transcript expression analysis of RNA-seq experiments with TopHat and Cufflinks. Nature Protocols 7,562–578 (2012) doi:10.1038/nprot.2012.016
- Trapnell C, Pachter L .,et al. TopHat: discovering splice junctions with RNA-Seq. Bioinformatics doi:10.1093/bioinformatics/btp120
- Kim D, Pertea G .,et al. TopHat2: accurate alignment of transcriptomes in the presence of insertions, deletions and gene fusions. . Genome Biology 2011, 14:R36
- Trapnell C, Williams BA .,et al. Transcript assembly and quantification by RNA-Seq reveals unannotated transcripts and isoform switching during cell differentiation. Nature Biotechnology doi:10.1038/nbt.1621
- Roberts A, Trapnell C .,et al. Improving RNA-Seq expression estimates by correcting for fragment bias. Genome Biology doi:10.1186/gb-2011-12-3-r22
- Roberts A, Pimentel H .,et al. Identification of novel transcripts in annotated genomes using RNA-Seq. Bioinformatics doi:10.1093/bioinformatics/btr355
- Trapnell C, Hendrickson D .,et al. Differential analysis of gene regulation at transcript resolution with RNA-seq. Nature Biotechnology doi:10.1038/nbt.2450


 留言列表
留言列表 {{ article.title }}
